How to Prune a Fruit Tree
Pruning is one of the most important aspects of fruit tree care. A fruit tree should be pruned every year for it to produce and perform at its best, preventing disease and over-fruiting, which damages the tree’s health and reduces the quality of fruit.
On This Page
Tools Used For Pruning
- We recommend loppers, hand shears, and a hand saw. Make sure the blades are sharp.
- A freshly sharpened set of hand pruners will be perfect for branches less than an inch in diameter. A set of loppers for branches less than 3″ in diameter is quite handy for those slightly bigger cuts. Our favorite tool is a pruning hand saw for branches less than 6″ in diameter.
- Long sleeve, gloves and safety glasses are very important for keeping your hands, arms and eyes protected from thorns and falling foliage.
- Sterilize your equipment – wipe down your tools with isopropyl alcohol, especially if you plan on pruning multiple trees. This will prevent the spread of any pests of disease.
Tree Shape and Form
When young, fruit trees are trained to grow in certain shapes that promote the optimal fruit production for that type of tree. You may be dealing with a mature tree that has become completely overgrown. When pruning, keep the original shape in mind, and try to make cuts that keep it in line with its original form.
There are 3 main forms commonly used for fruit trees:
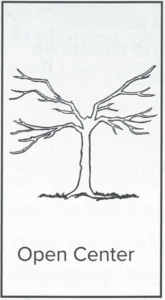
Open Centre
3 or 4 main limbs growing outward and upward. Open in the middle, meaning sunlight can get right into the branches to help that fruit grow.
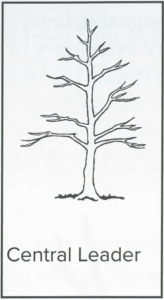
Central Leader
A single strong trunk grows straight up, with layered side branches called scaffolds growing off the leader in 3 or 4 well placed layers.
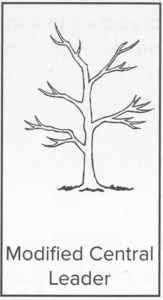
Modified Central Leader
This is a hybrid that starts as a central leader and then becomes an open centre.
How to Prune (in Three Steps)
Step 1: Clean Up Your Tree
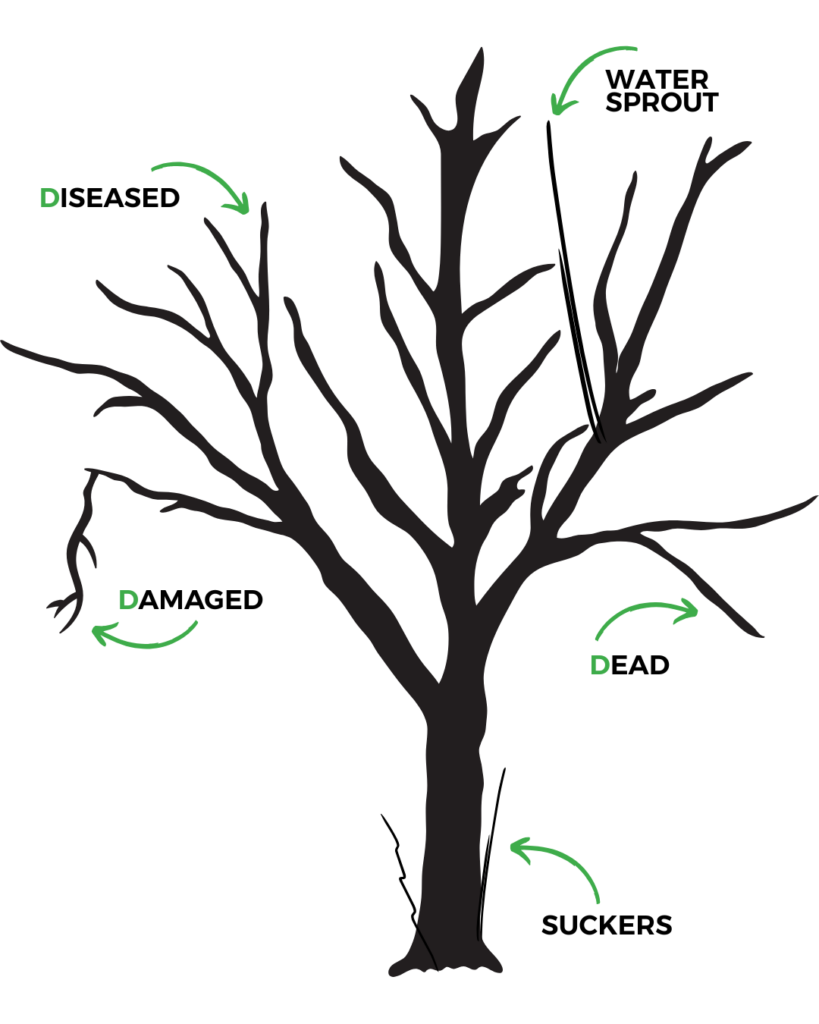
Remove the “3 Ds”: any dead, damaged, or diseased wood.
Prune suckers coming straight up from the base of your tree, as well as vertical sprouts coming from some of the main branches. Make sure that your cuts are flush to the larger limb they’re growing from.
Make your pruning cuts. There are two main types of pruning cuts: thinning and heading. Thinning cuts remove cutting an entire branch off at its point of origin. Heading cuts are like giving your tree a trim. These cuts remove a portion of the branch back to a healthy bud, which can promote more vegetative growth. All cuts need to be made at a 45 degree angle so that water doesn’t collect and promote disease.
Step 2: Thin it Out
The goal of this step is to allow light and air into the canopy to reduce potential problems with pest and disease. You also want sunlight to get to the lower fruiting branches. Thin until there is a good 6 to 12 inches of air space around each branch. Remember to keep all your thinning cuts flush to the branch.
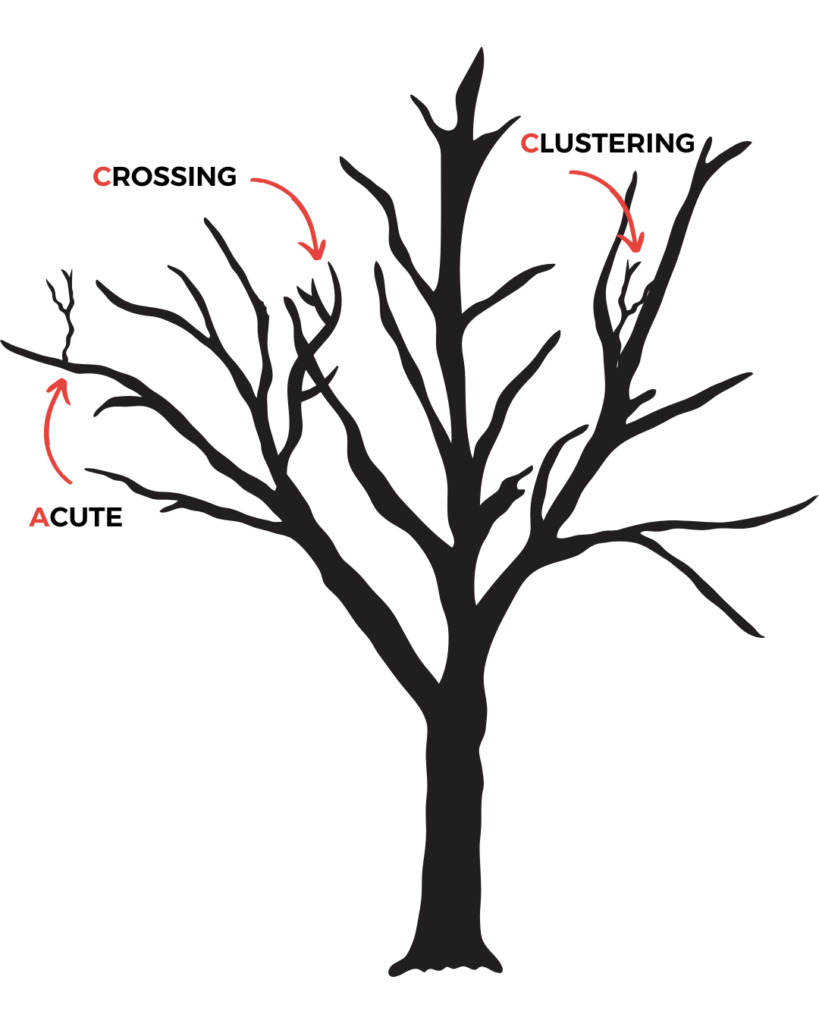
Remove the “CACs”: Clustering, Acute and Crossing branches:
If multiple branches are clustering, thin out all but one branch. You want to keep the healthiest looking branch with the best “crotch angle” from the tree (i.e. an angle of about 45-60 degrees).
Acute branches have two sharp angles from the trunk and are susceptible to snapping once they become laden with fruit. Keep branches that have at least a 45-60 degree angle.
Remove branches that are crossing paths with another branch or growing downwards to the centre of the tree or ground.
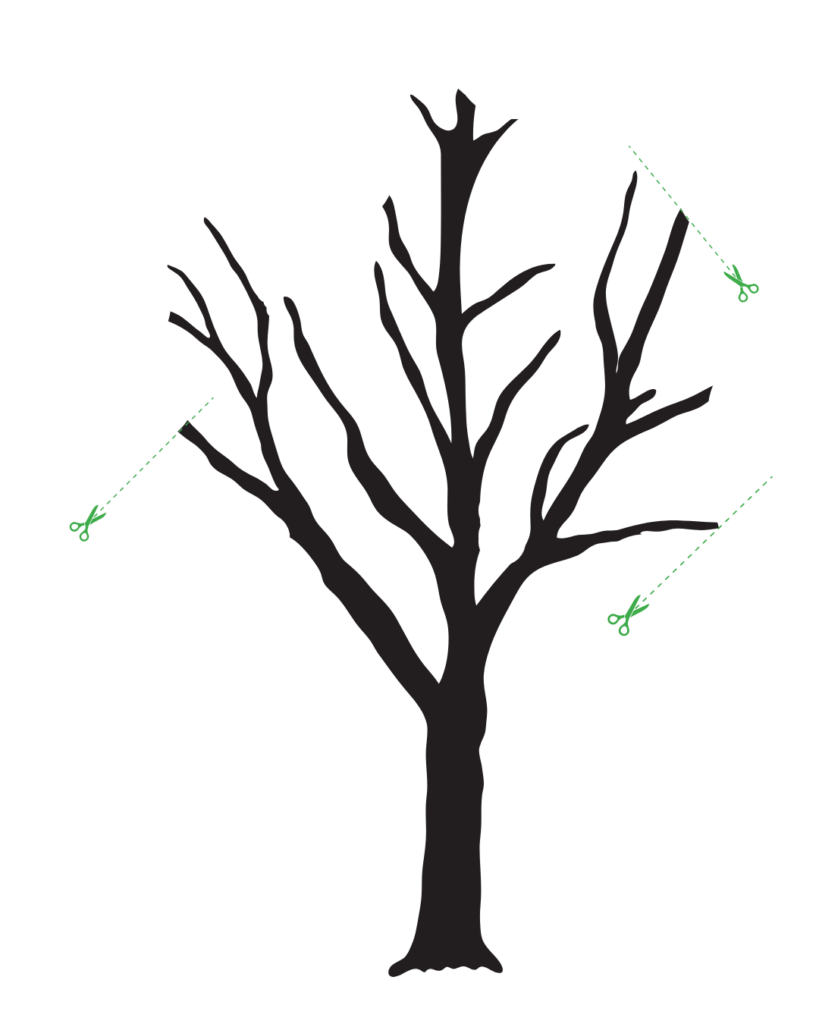
Step 3: Head it Back
In the final step you want to “head back” the tree – aka trimming the outermost growth on the tree (like a haircut). This ensures your branches don’t become too long and gangly.
Cut off 20-30% of last year’s growth. You can tell where last year’s growth starts by a wrinkly ring of bark on each stem. Branches have fruit buds (these produce blossoms), and wood buds (these produce leafy growth). Wood buds in apples and pears are thin and pointed. Fruit buds are plump and stubby, and as they get older they form spurs (a mini compressed stem).
Cut back new growth by half to an outward facing bud. Make cuts at a 45-degree angle and 1/4″ above outward facing buds
Stimulate growth of side branches where fruiting is desired by making heading cuts. These cuts will be made partway into each branch. NOTE: It’s important where you make the cut. You want to cut your branch back to one-quarter inch above an outward growing bud. This ensures it will grow outwards, instead of inwards. Make the cut in a 45 degree angle in the same direction as the bud. Why 45 degrees? This ensures water runs off the cut, and doesn’t pool where it can lead to disease.
Pruning Don’ts
- Don’t remove more than 25% of the tree per year. Otherwise it will try to repair the damage by producing too much new growth. Dead and damaged wood doesn’t count in the 25%.
- Don’t go overboard on old fruit trees. Yes, they’re probably a mess. You may need to prune slowly over 1-3 years. In year 1 focus on the 3Ds. In year 2, follow the CAC rule to reduce congestion and start shaping the tree, and in Year 3 you can focus on fine-tuning and using the heading cuts.
- Don’t “top” your tree. This means cutting off the tree’s top in an attempt to reduce the height. This will only cause excessive sucker growth.
- Don’t cut into the collar of branches. The “collar” is where the branch attaches to the tree’s trunk. If you cut into the collar it may lead to decay spreading into the tree’s trunk. Also make sure you’re not cutting too far, as the tissue will die and delay the wound closure. You want it flush to the branch without going into the collar.
- Don’t damage or rip the bark when cutting. Avoid dull tools, properly cut large branches so they don’t rip under their weight when falling.
- Don’t put yourself at risk! If your tree is tall it will require the help of a Certified Arborist to do the job safely. You do want to make sure you find an arborist who understands pruning for fruit production.
Summer Pruning: Apricot, Sweet Cherry & Plum
Apricots
Heavy pruning is needed to keep an apricot tree producing. The best shape to keep your tree in is low and wide-spreading with no long branches. The basic idea of pruning an apricot tree is to allow space in the middle to let light come in. If you’re standing in the centre of the tree you want to look up and see nothing but clear blue sky! You want the middle of the tree to look like a mixing bowl. A good place to start is by clearing the centre of the tree.
Prune back all of last year’s growth to about 50% of its length. Make sure to prune to an outward facing bud. By pruning to an outward bud at the middle of the branch, leaving 50-60% of the new growth, you’ll have the most fruitful buds left at the outside of the tree.
Sweet Cherries
Make sure you prune your cherry trees in late summer. This is because it’s susceptible to pests and disease when it’s cold and wet. You want to prune your cherry tree to keep a “central leader” shape. This means it should look like a Christmas tree with scaffold branches coming off a main trunk (the “central leader”). You’ll also want to cut out upper branches that are providing excess shade to lower branches. To maintain your central leader structure, you want the branches on the top of the tree shorter than the branches on the bottom. This will allow sunlight to reach the lower branches. Keep in mind that sweet cherries fruit at the base of last year’s new growth and all along older branches
With cherry trees it’s especially important to clean your tools before use to prevent disease.
Plums
If your plum isn’t too tall and is fairly healthy, you can leave the tree at its existing height and prune it to clear branches that don’t bear fruit. Encourage an open vase shape and allow more sunlight to reach the centre of the tree. Ideally the main stem should have 3 (maximum 4) main branches that grow out from it, and the branches should spread outwards, not inwards. If you have more than this, you can reduce the number.
Another thing to keep in mind is that plums fruit on young wood. Avoid removing branches that are less than three years old unless you have to.
If you have an established, overgrown plum tree the best time to prune is when it’s growing strongly from early June to Mid July. Do not prune it in the winter or spring because the risk for fungal infection is high.
Late Winter & Spring Pruning: Apple, Sour Cherry & Pear
Apples
You want to keep your apple tree pruned to one central leader (aka the central trunk). Your final result should look like a pyramid (or Christmas Tree) will well spaced horizontal branches. Make sure the upper branches are shorter than the lower branches. It’s said that a bird should be able to fly through an apple tree without its wings touching a branch! To spur growth, the best time to prune your apple tree is in late winter to early spring.
Sour Cherry
Prune in early spring before the bushes break dormancy. When the tree is dormant, the full form and structure are visible, making it easier to identify broken or crossed branches. Pruning in late winter/early spring helps to prevent the spread of diseases and promote healthy growth. Waiting to prune until summer or in the fall can weaken the tree and make it more susceptible to winter damage. Remove some older branches to improve air circulation and sunlight penetration, which encourages fruit production. Prune to maintain a funnel-shaped canopy, which allows for good airflow and sunlight exposure. Finally, avoid removing more than 25% of the wood in a single year.
Pears
Pears grow really vertically. To make sure your tree doesn’t get too high and un-pickable, you’ll have to prune to work against this vertical growth. The first thing you want to do is decide how high you want it. Keep in mind that trees that haven’t been pruned in many years shouldn’t be reduced to the desired height in a single pruning. You should plan on reducing the height over a period of 3 years by removing no more than ⅓ of the tree in 1 season.
Your goals for pruning pear trees are to reduce the height, remove unproductive wood, and thin out branches.
Pear trees do best when pruned to a central leader. You want to establish solid scaffold branches (the main, horizontal branches) that grow out from the central leader. There should be about 4-6 scaffold branches distributed evenly around the tree, about 4 feet in height vertically from one scaffold to the next. To control the height, cut back your central leader (the main stem) to just above the top scaffold.
Fall & Winter Pruning
Quince
Make sure to only prune quince in the late fall or winter when the tree is dormant. Don’t wait until spring or you may lose your crop for the year! This is because quince only produces fruit on the tips of new growth.
Quince need a lot of sunlight. Aim to keep your quince tree shaped in a vase or goblet style. This shape keeps the centre of the tree open, exposing more of the tree to sunlight. If your tree is well established, the main focus of your pruning should be on clearing the centre of the tree and keeping it tidy. This means removing any vertical branches in the centre that ruin the open goblet shape. Older branches that aren’t budding or show little growth can be trimmed back completely.
Recommended Reading
- How to Prune Young Fruit Trees by Orchard People
- Tree Pruning 101 by LEAF
- Pruning Fruit Trees by Four Winds Growers